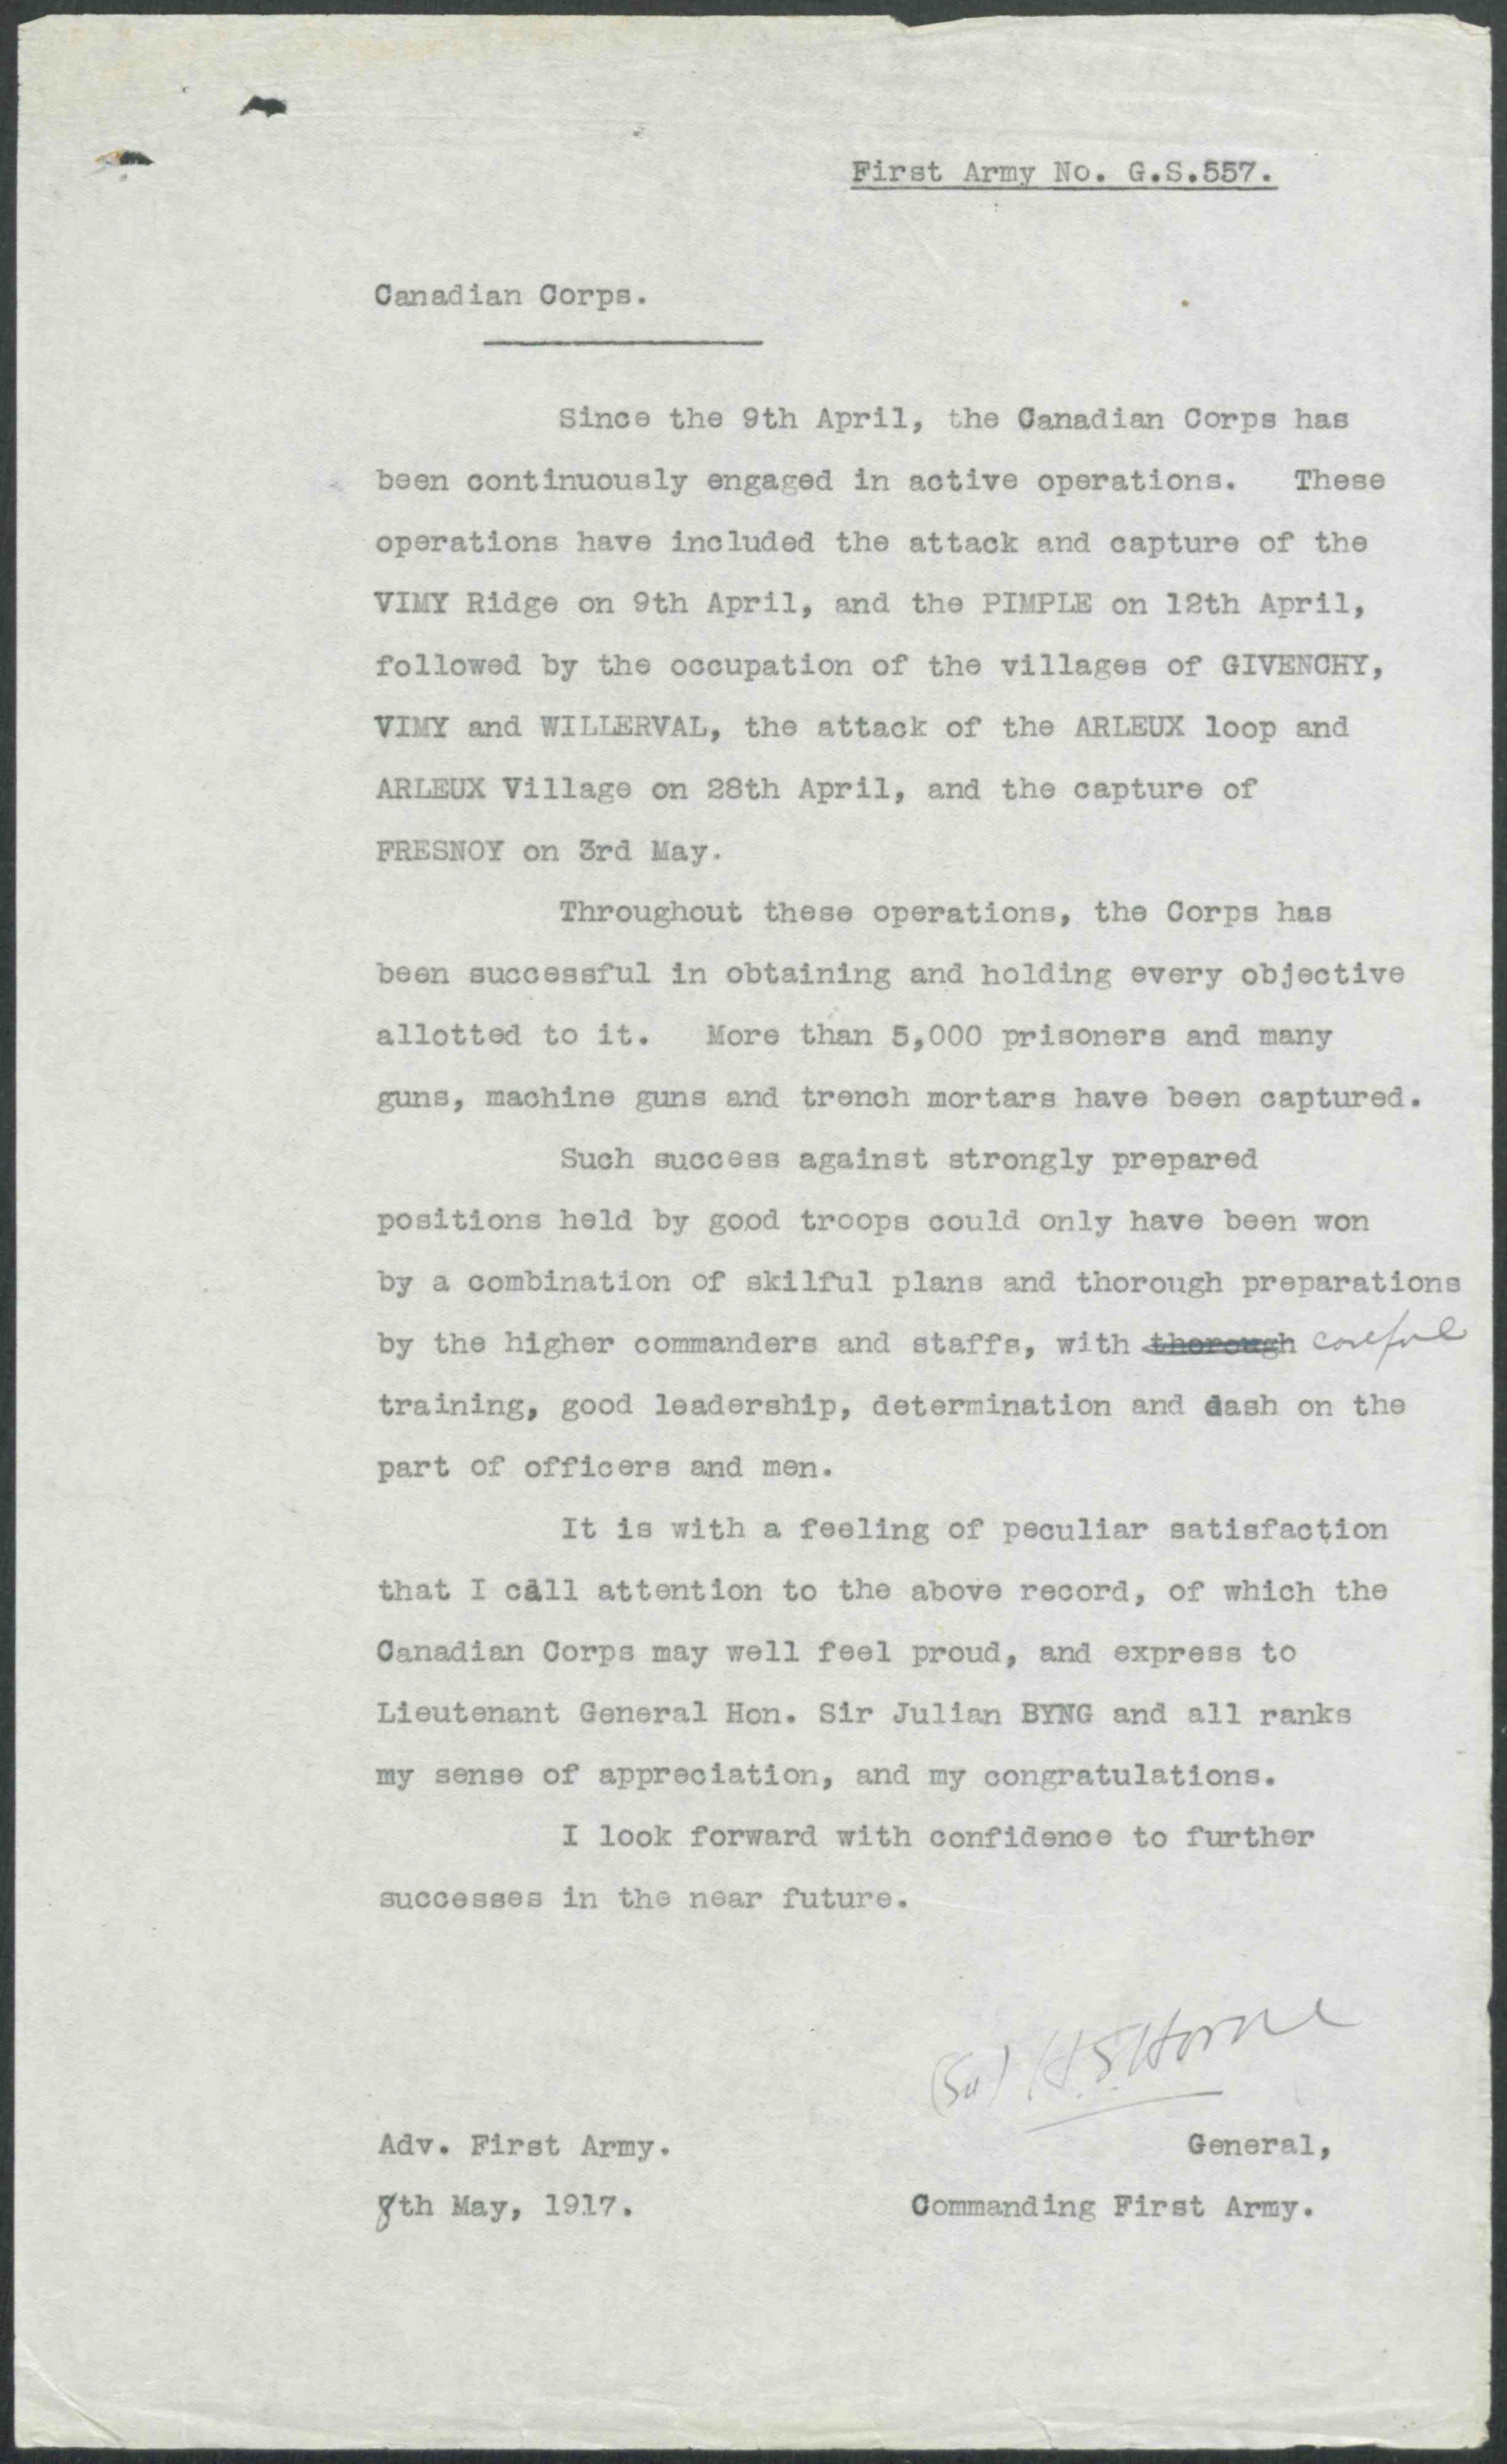
By Ethan M. Coudenys
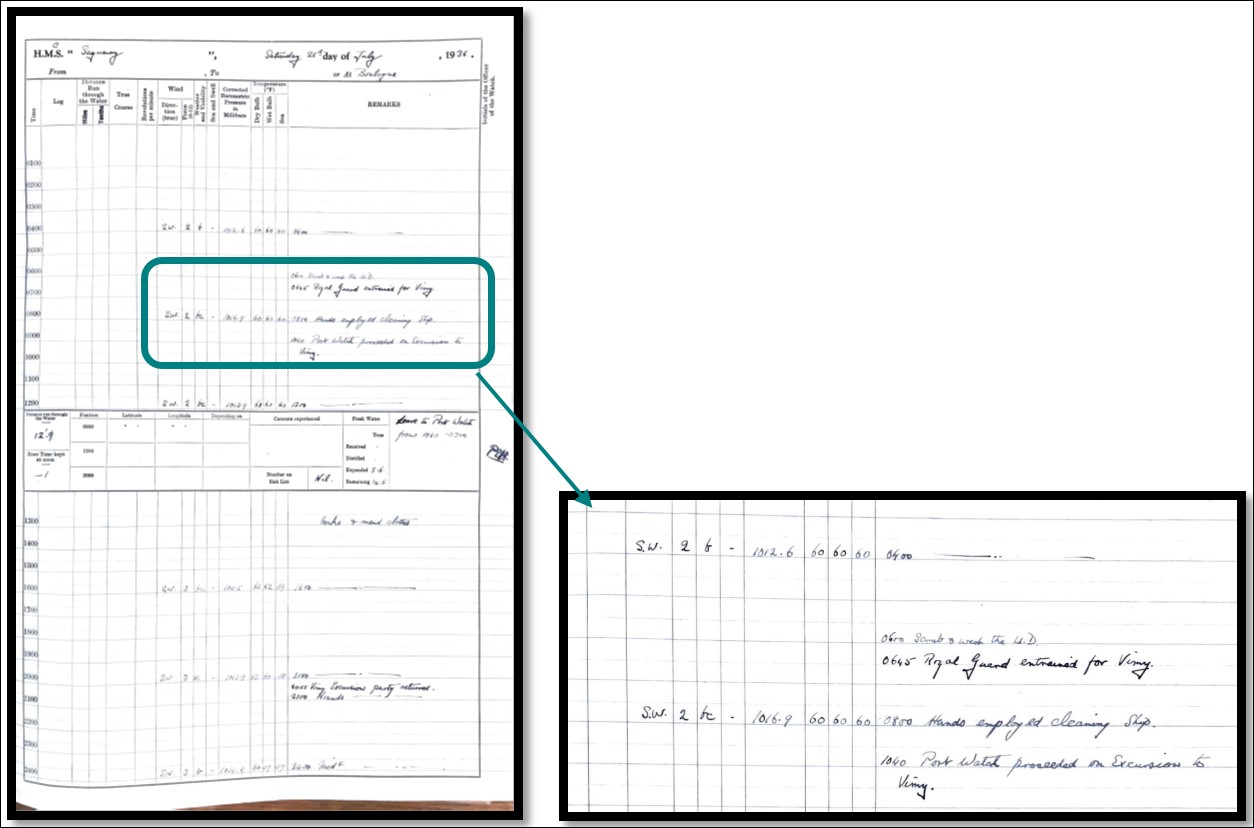
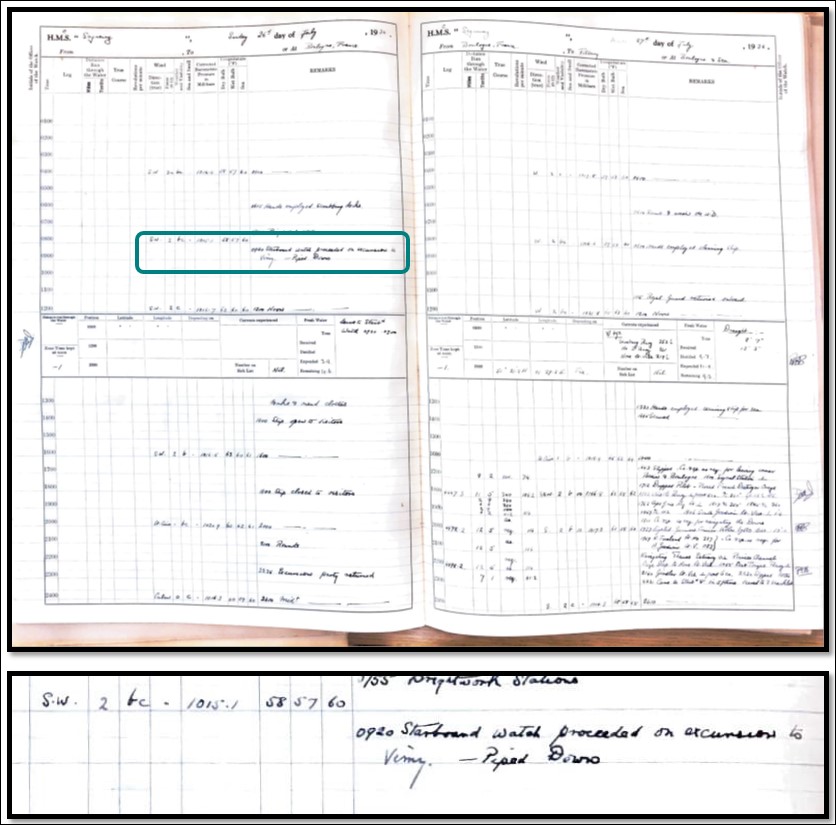
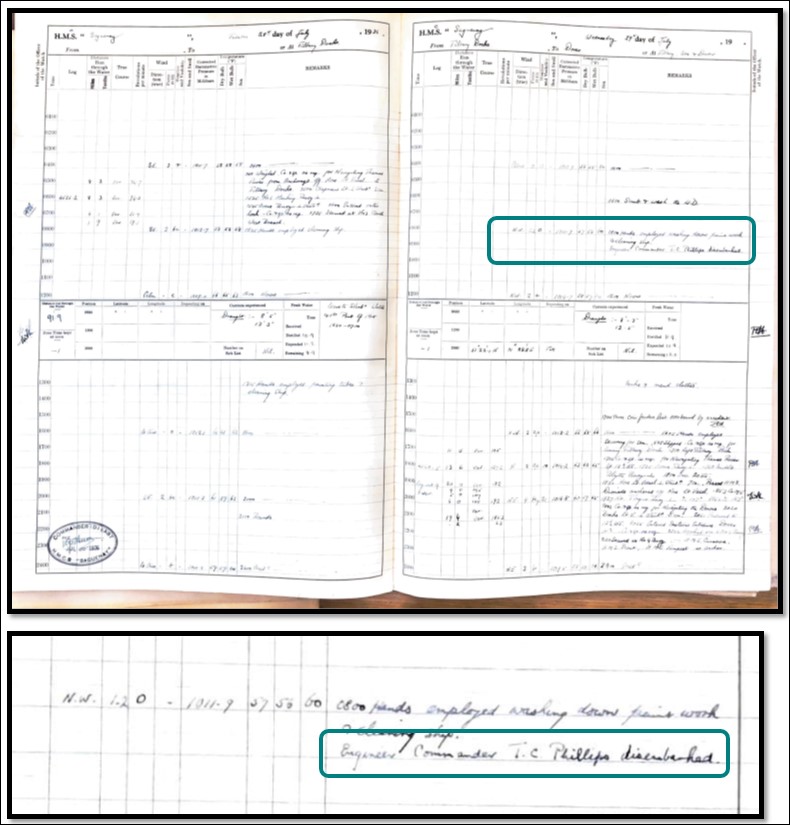
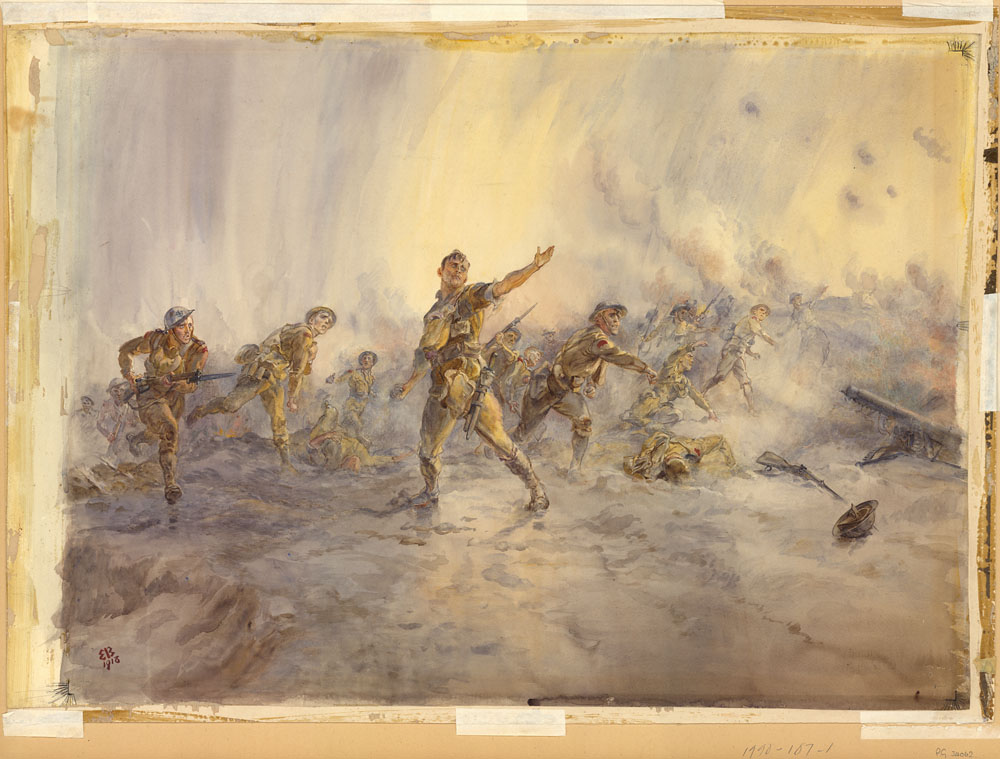
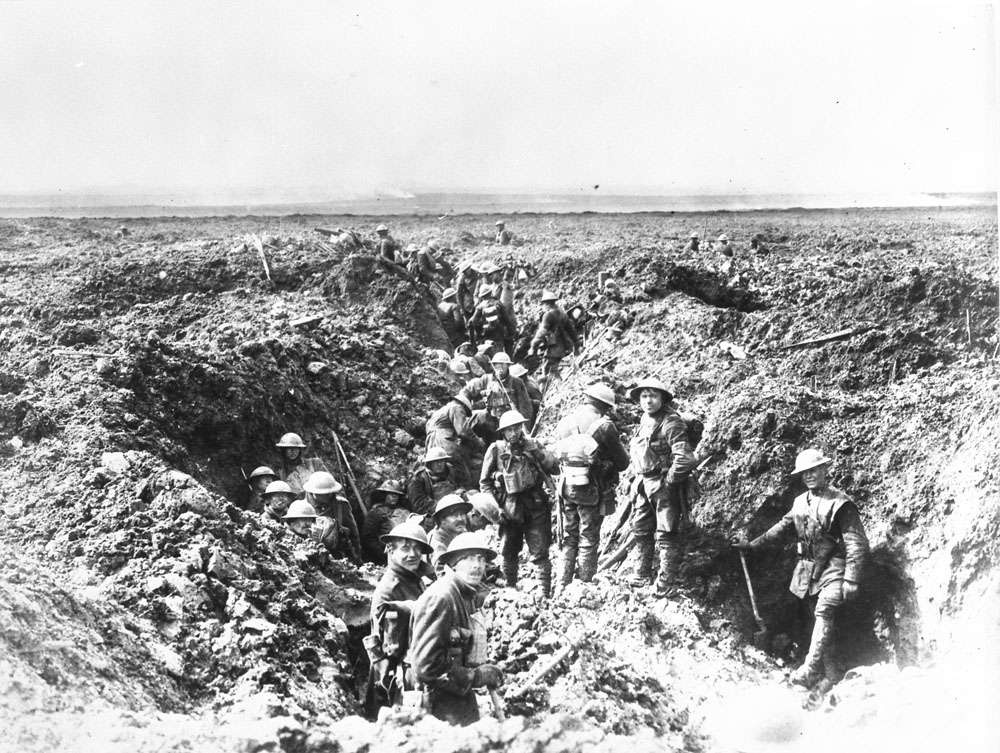
Picture the scene of the moments leading up to a massive military advance. On the morning of April 9, 1917, a cold rain falls on the Douai plain in France. To the west, a great number of Canadians have gathered to begin their attack on Vimy Ridge at precisely 5:30 a.m. Of the approximately 30,000 men preparing to advance that day, roughly a third are hidden underground in tunnels built specifically to hide them from the German forces’ lookouts. At the moment of attack, the men burst from the tunnels and shower brimstone and hellfire on the forces that oppose their advance.

Grange Subway under Vimy Ridge, August 17, 2022. Image courtesy of the author, Ethan M. Coudenys.
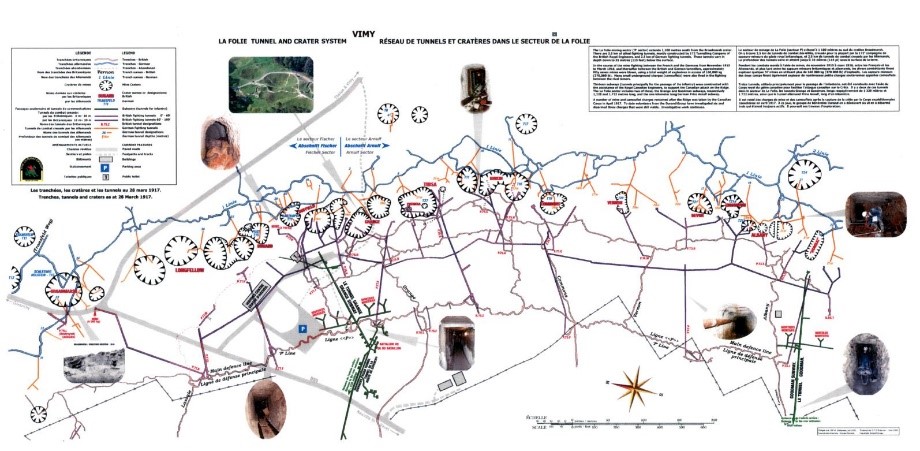
These tunnels were mainly constructed by the Welsh Companies of the Royal Engineers. The Welsh miners were mostly professional miners, and they would cut through the chalk stone 10 to 15 metres below the battlefield in near-total darkness. Some 10 kilometres of underground tunnels ran from the furthest Canadian rear trench to the front of the line. They were used to move supplies, run messages and conceal the advancing army on the day of the attack.
Speaking from my experience as a tour guide at the Canadian National Vimy Memorial at Vimy Ridge, these tunnels, often filled with water, bats, rats and unusual smells (probably far worse back then), were incredibly confusing to traverse during the First World War. There were electric lights every 20 metres or so, but the tunnels were dark, twisting and loud. Chalk conducts sound, so soldiers could hear, not only every shell falling on the surface with some clarity, but also miners digging away and the few soldiers and officers shuffling through the tunnels.
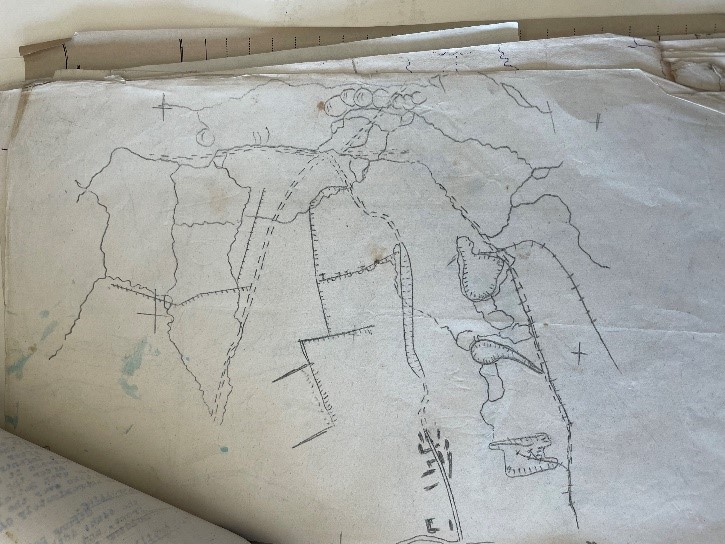
To avoid confusion, maps were created to prevent messengers and officers from getting lost in the subterranean labyrinth. Only one of these tunnels, the Grange Subway, is currently open to visitors at the Vimy Ridge National Historic Site. The Durand Group, a research and exploration association, is carrying out the dangerous work of investigating and uncovering tunnels and redoubts, but these efforts have not yet resulted in additional tunnels being opened to the general public. Nevertheless, the Durand Group’s work provides insights into what the maps of different tunnels were like at this time in the war, as the association maps and reports on newly uncovered tunnel systems in France and Belgium.
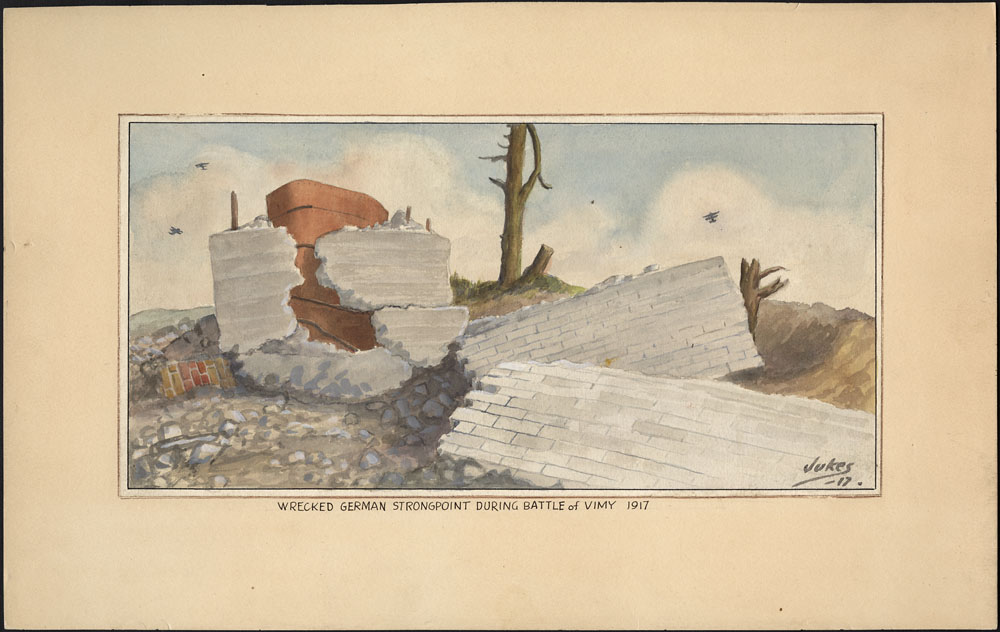
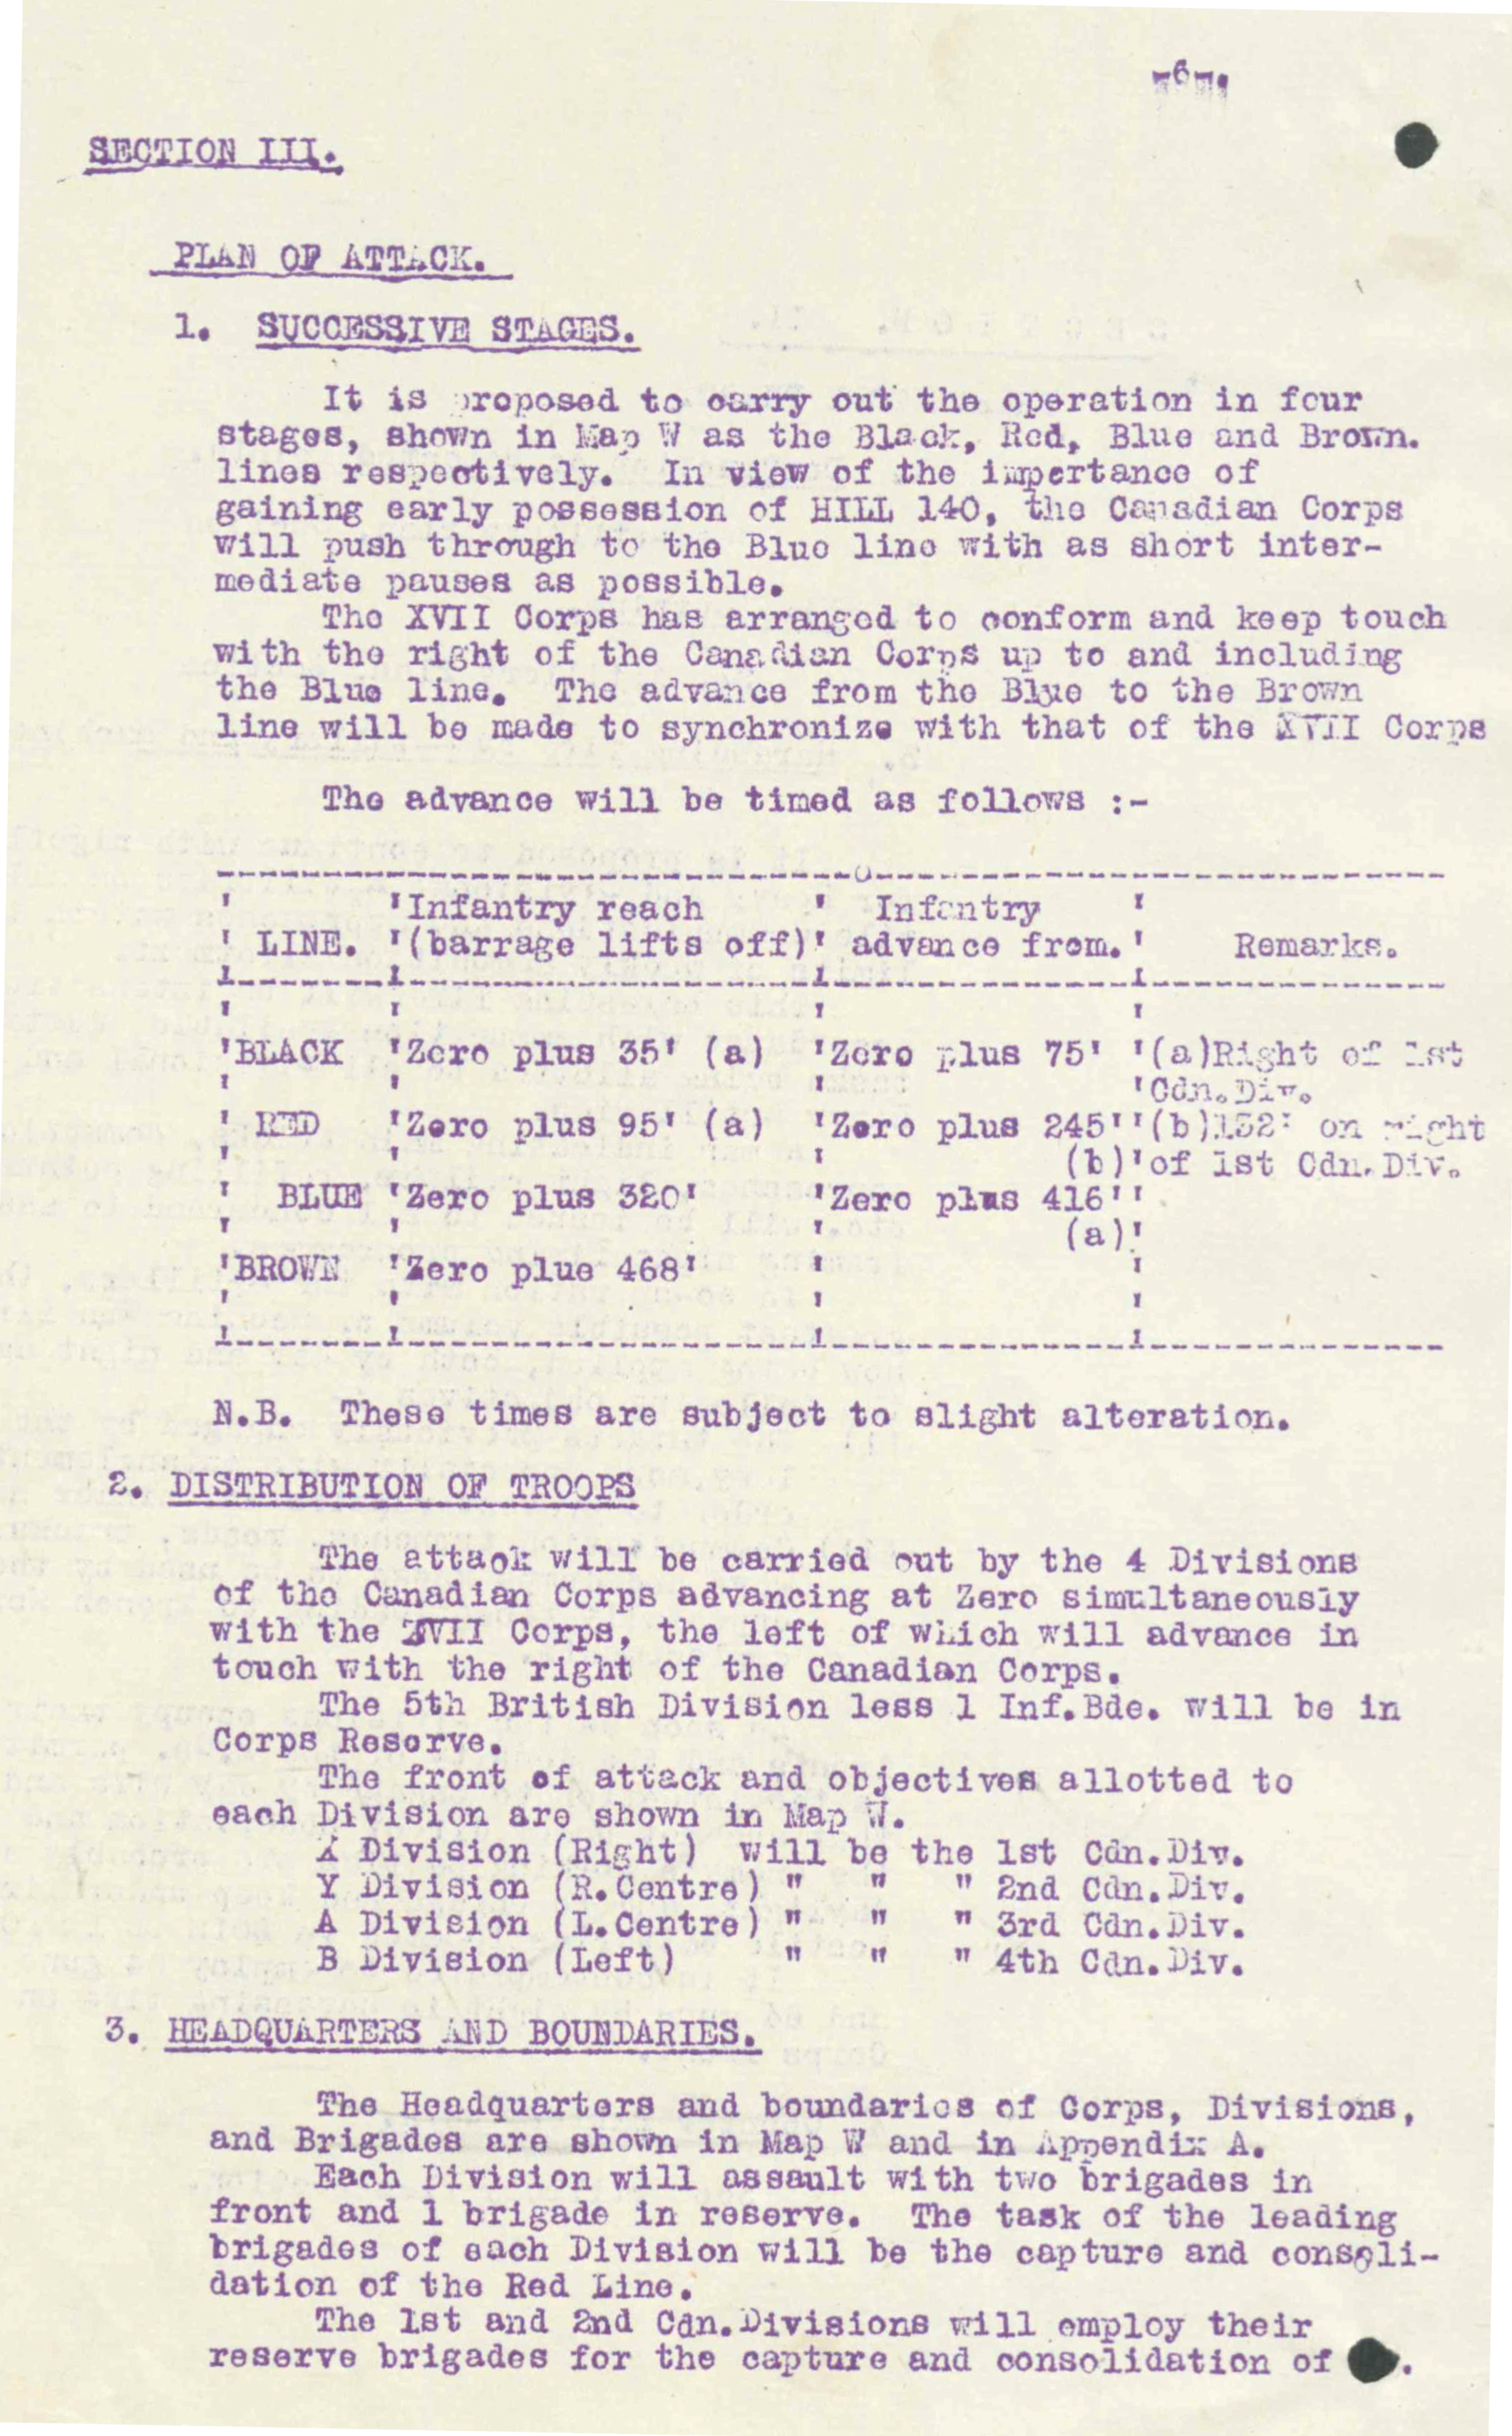
The attack on Vimy Ridge consisted of two different phases. The first, and most famous, is the taking of the ridge along the 12-kilometre-long front line for which the Canadian Expeditionary Force (CEF) was responsible. The CEF had four main objectives, but Hill 145, the highest part of the ridge, was the declared central target for the operation. The second phase was taking the Pimple (also known as Hill 119). This was a heavily fortified and well-manned artillery and heavy machine gun post at the top of a hill. It was very easy to defend, and very useful if the German forces wanted to regain territory lost in the first phase. Thus, the second phase of the Battle of Vimy Ridge is now known as the Battle of Hill 119 (or the Pimple).
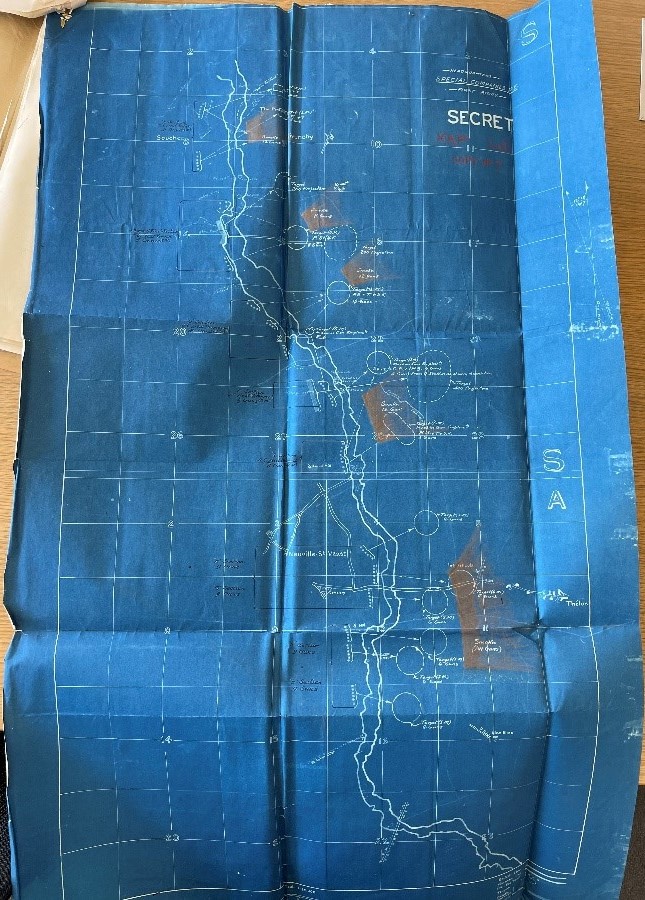
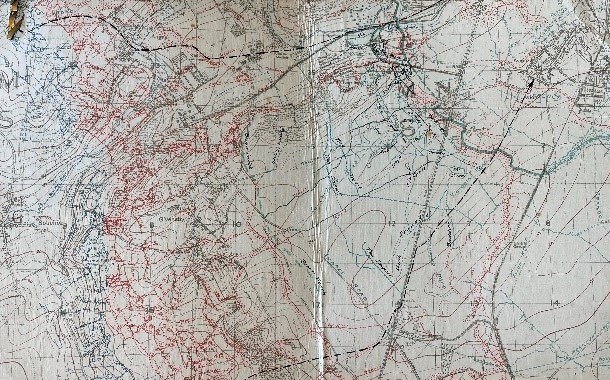
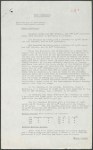
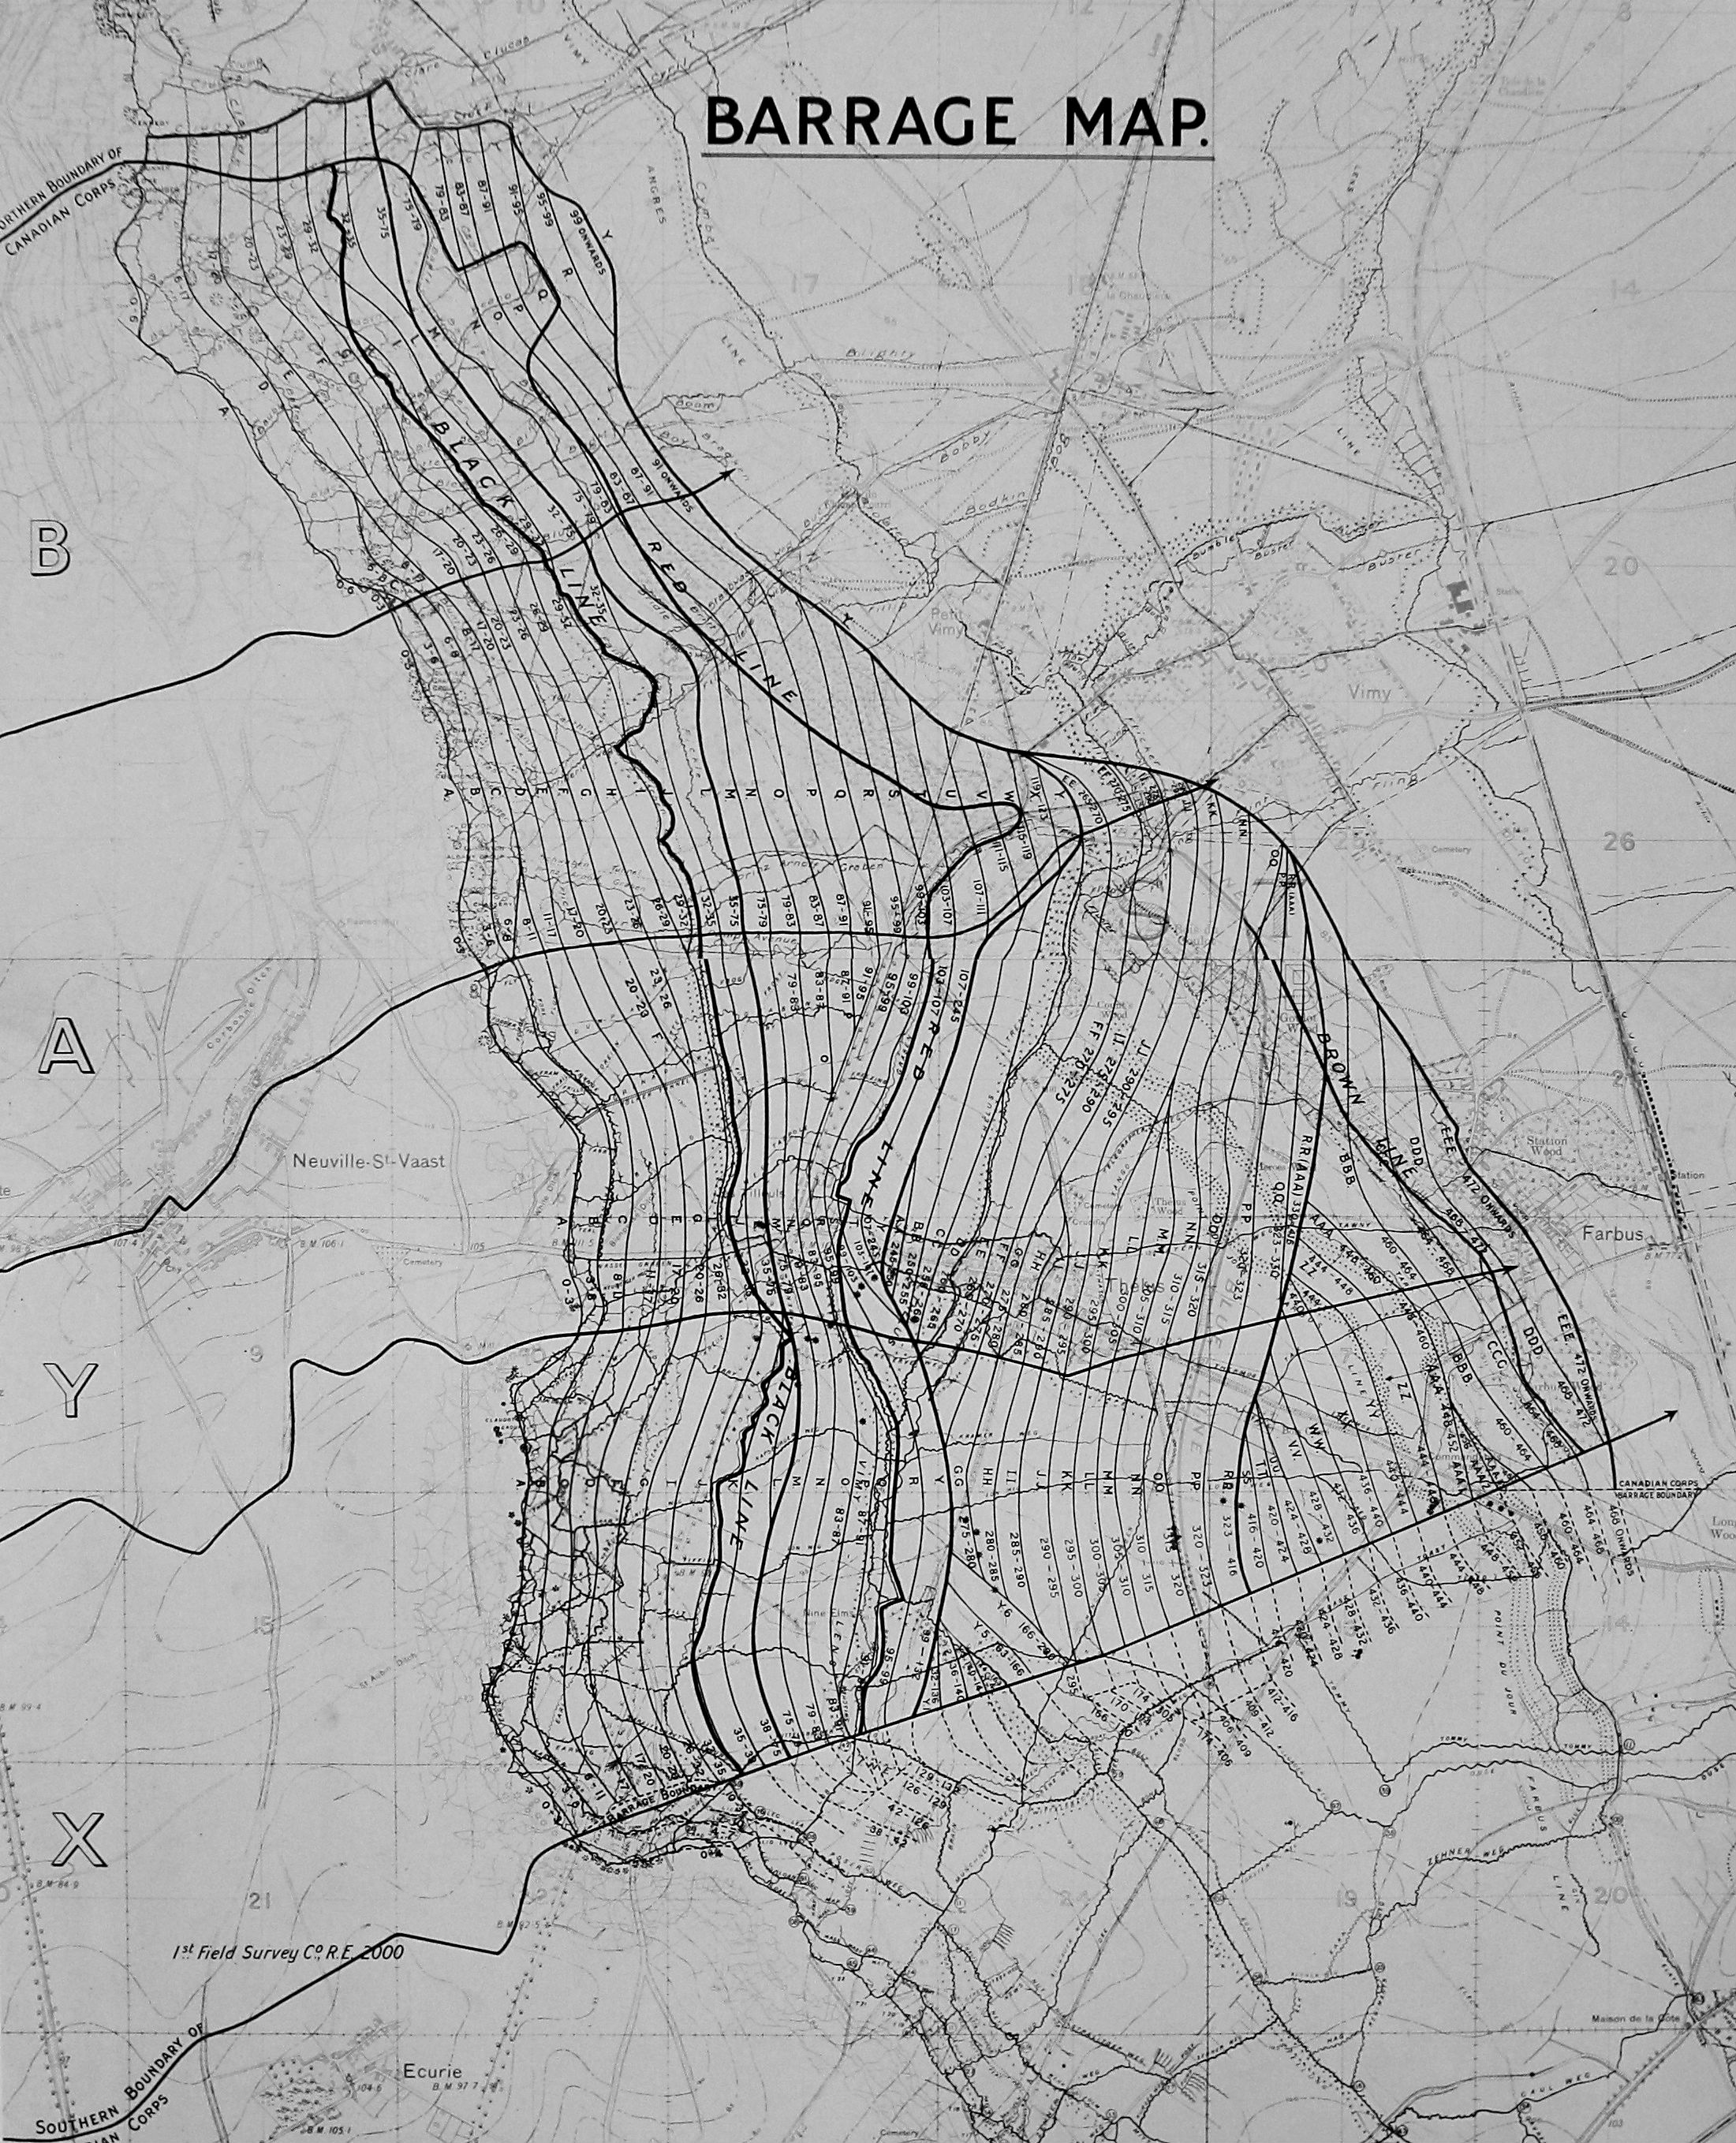
Artillery barrage plan – Battle of Hill 119 (or the Pimple) (MIKAN 3946966). Photo: Ethan M. Coudenys.
Mapping the artillery attack
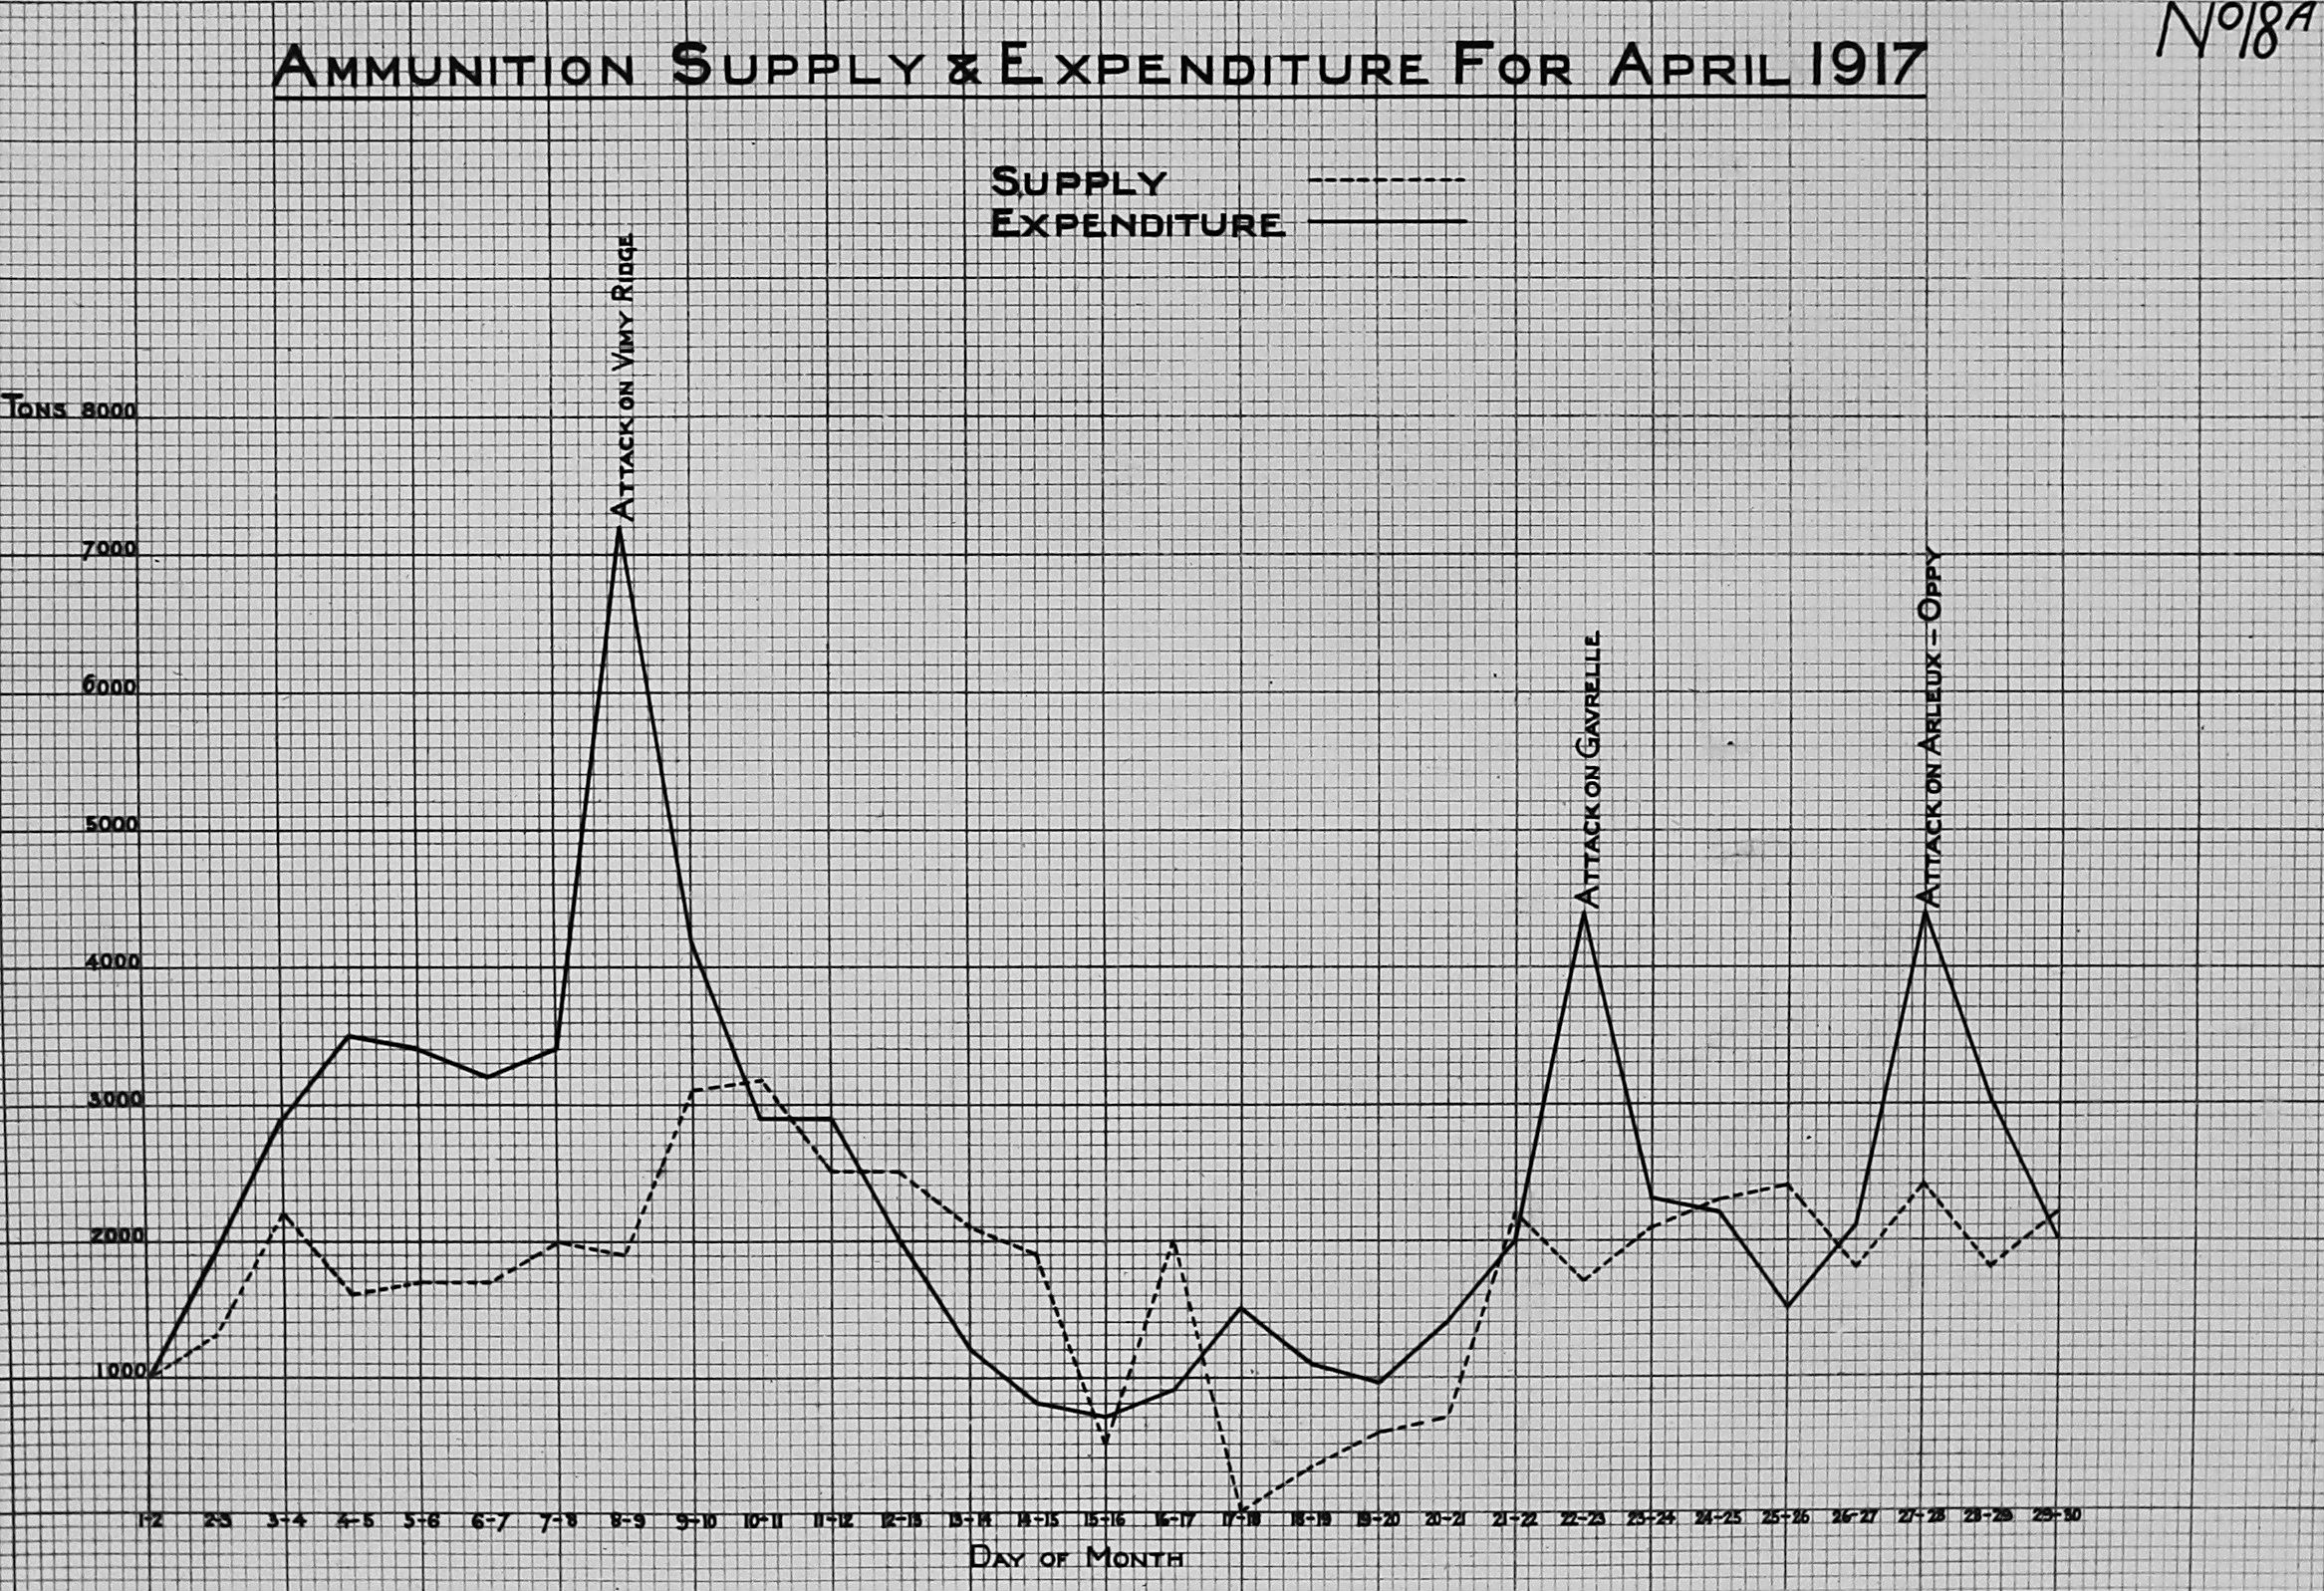
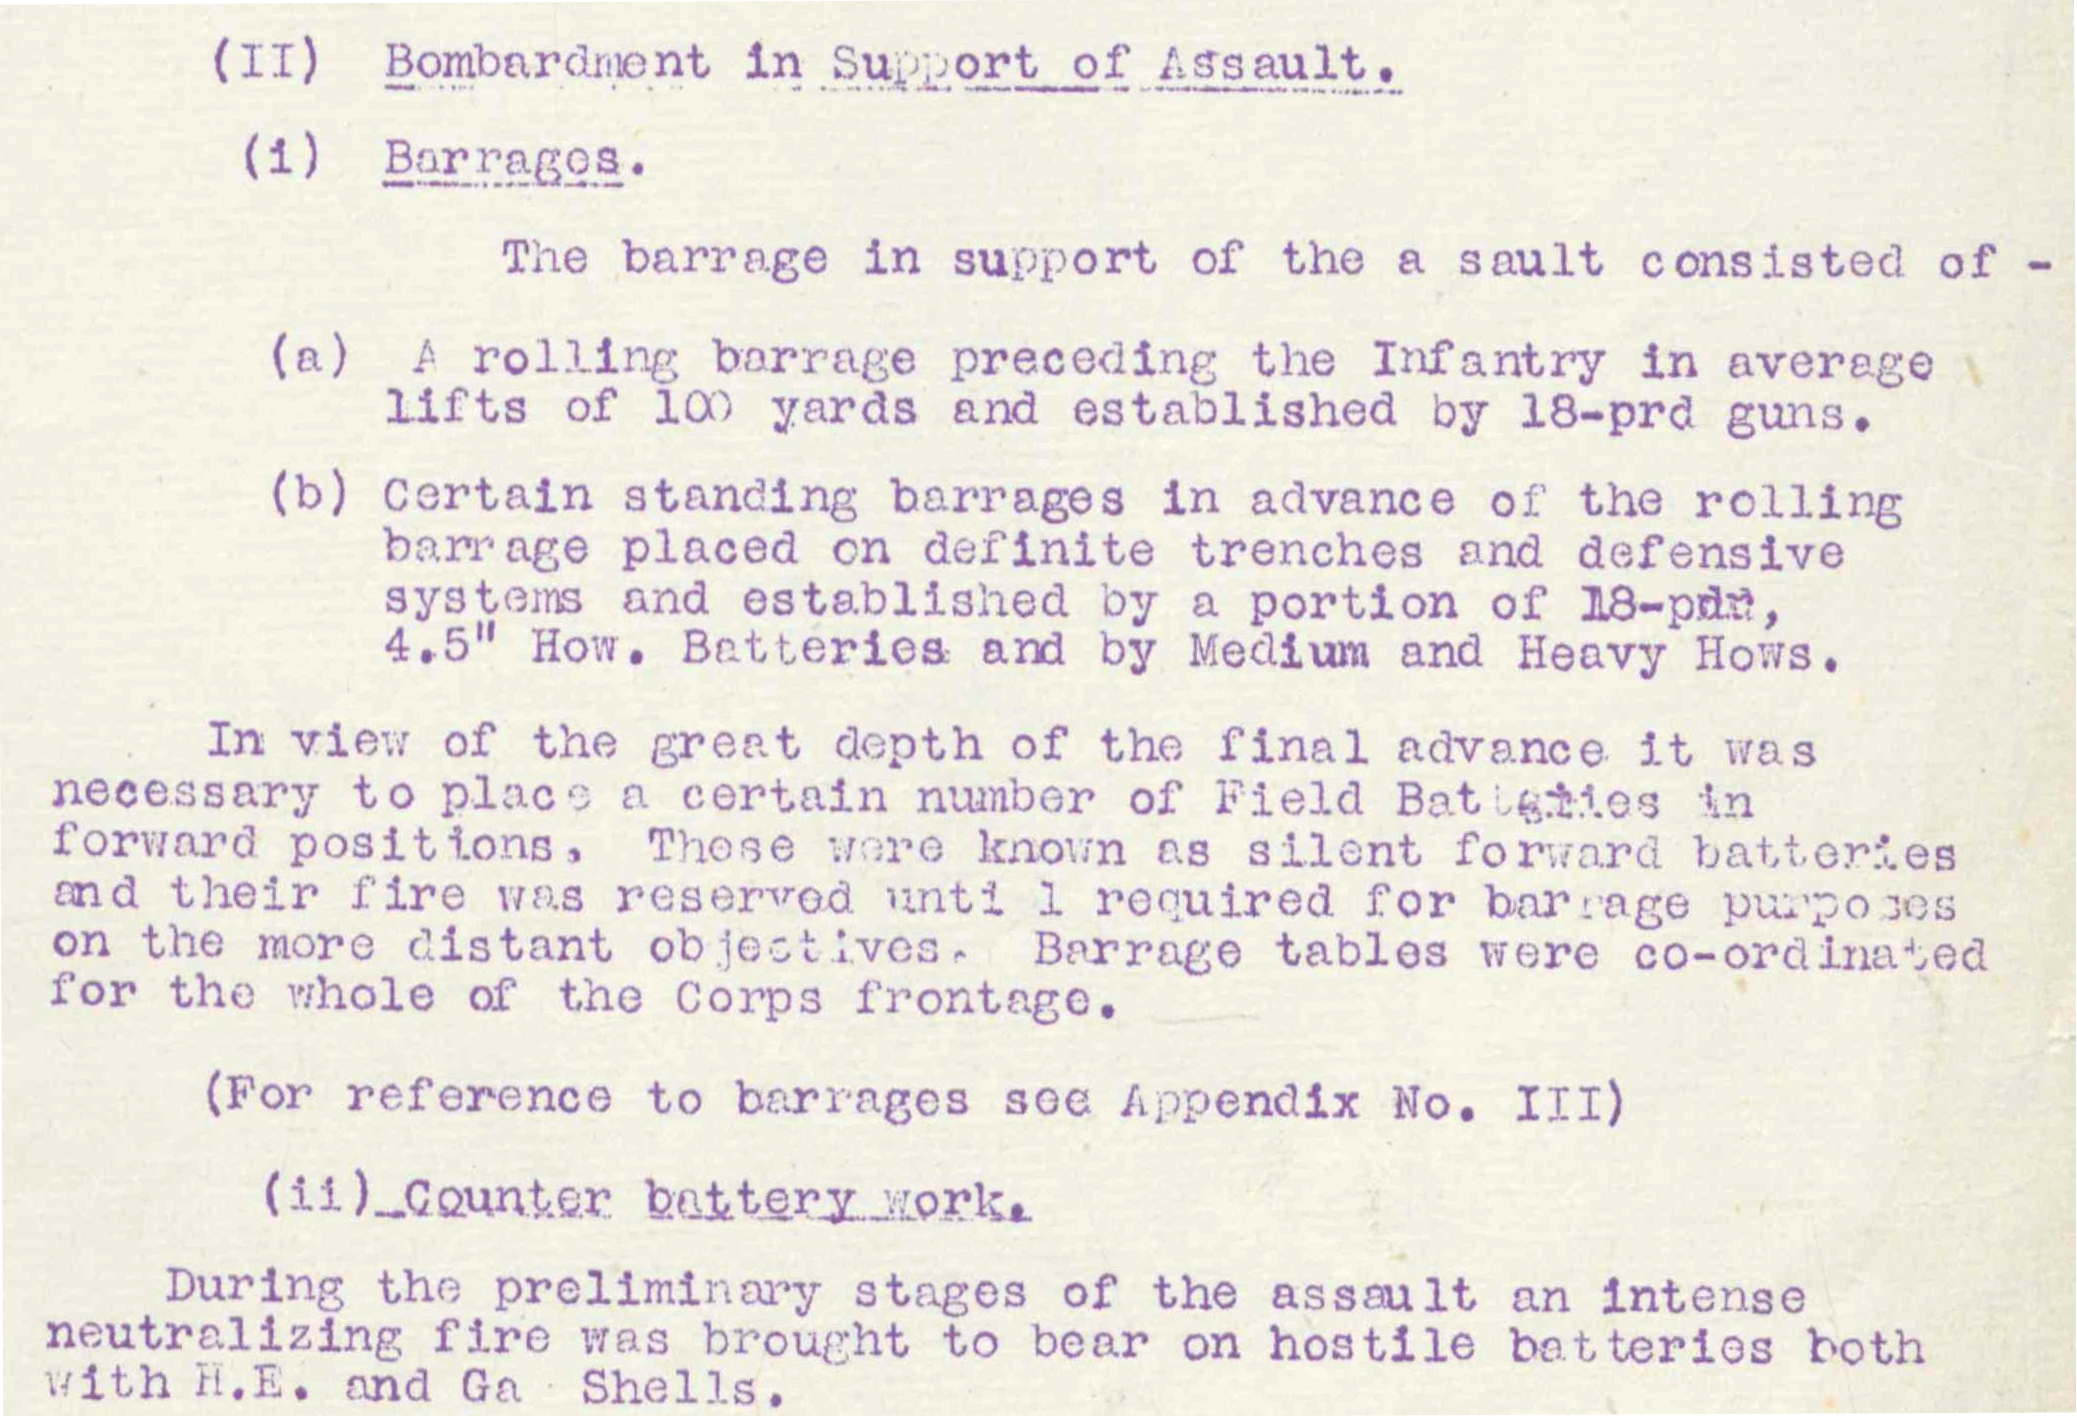
The Vimy Ridge and Pimple attacks were Canada’s contribution to the larger military operation of the Battle of Arras, which took place along a 30-kilometre front led by mostly British forces. One of the most important elements of the attacks was the efforts of the artillery brigades, for which both Canadian and British artillery units worked in tandem to aid the advance of the infantry troops. This effort required immense preparedness and incredible tenacity. It was critical for artillery units to follow the same schedule, to ensure that the barrage of artillery shells would advance at a very specific pace of 100 metres every three minutes. Every unit was therefore issued maps and specific timings on each of the changes in range, as well as the speed of firing. This tactic was called a rolling (or creeping) barrage.
To expand on the discussion in part 1 of this post, a rolling barrage is a military tactic largely developed by British and Canadian generals who had witnessed the failure of artillery support at the Battle of the Somme in France (July–mid-November 1916). The rolling barrage tactic involved firing a wall of shells into no man’s land and advancing the wall slowly, so that the opposing forces could not exit their shelters to mount an effective defence before the infantry troops reached their line. This tactic was effective in eliminating defensive enemy snipers and machine guns during the start of the Vimy Ridge battle. Canadian writer Pierre Berton states in his work on Vimy Ridge that the roar of the artillery firing was so loud that it could be heard as far away as London. To the soldiers advancing into dangerous territory, it seemed as though the sky was made of lead, because of the sheer number of shells flying overhead.
Let us now turn to the various maps of the artillery on Vimy Ridge. For the assault on Hill 145, it was important for the infantry and artillery to be synchronized. The artillery commanders received the same maps as the infantry units so they could measure the advances of the various divisions and brigades, sometimes kilometres away.
More importantly, the artillery officers received maps of specially chosen target areas, to help them destroy major defensive installations before the infantry came into range of those positions. These target areas could be machine-gun nests, sniper posts, defensive artillery pieces or mortar emplacements. Part of the plan of attack was to ensure that there was a significant time gap between the first and second advance. For example, the distance between a red line and a black line would be roughly a 30-minute interval, during which the secondary wave of infantry and supporting troops could move up. In other words, the artillery would fire on specific targets for a set amount of time, wait 30 minutes to allow the infantry to advance, then fire on more distant targets. This allowed for the infantry to rest and fortify their newly taken positions, while the artillery targeted the potentially dangerous defensive fortifications further along the front.
To capture the Pimple, the strategy was quite different. While the artillery continued to use the rolling barrage, they also used two new tactics that were introduced and developed during the Great War. The first was creating what some scholars have called a “killing field,” where, through heavy artillery fire, defending troops are forced to leave their shelter for open space and then are targeted by machine guns and artillery. The second was the launching of smoke screens. The artillery would launch barrels of burning oil into the battlefield, creating a thick, black cloud of smoke to hide the advancing infantry. These two tactics would become a trademark approach of the Canadians in later battles, including the Battle of Hill 70 in Lens, France (August 15–25, 1917) and the Third Battle of Ypres (Passchendaele) in Belgium (July 31–November 10, 1917).
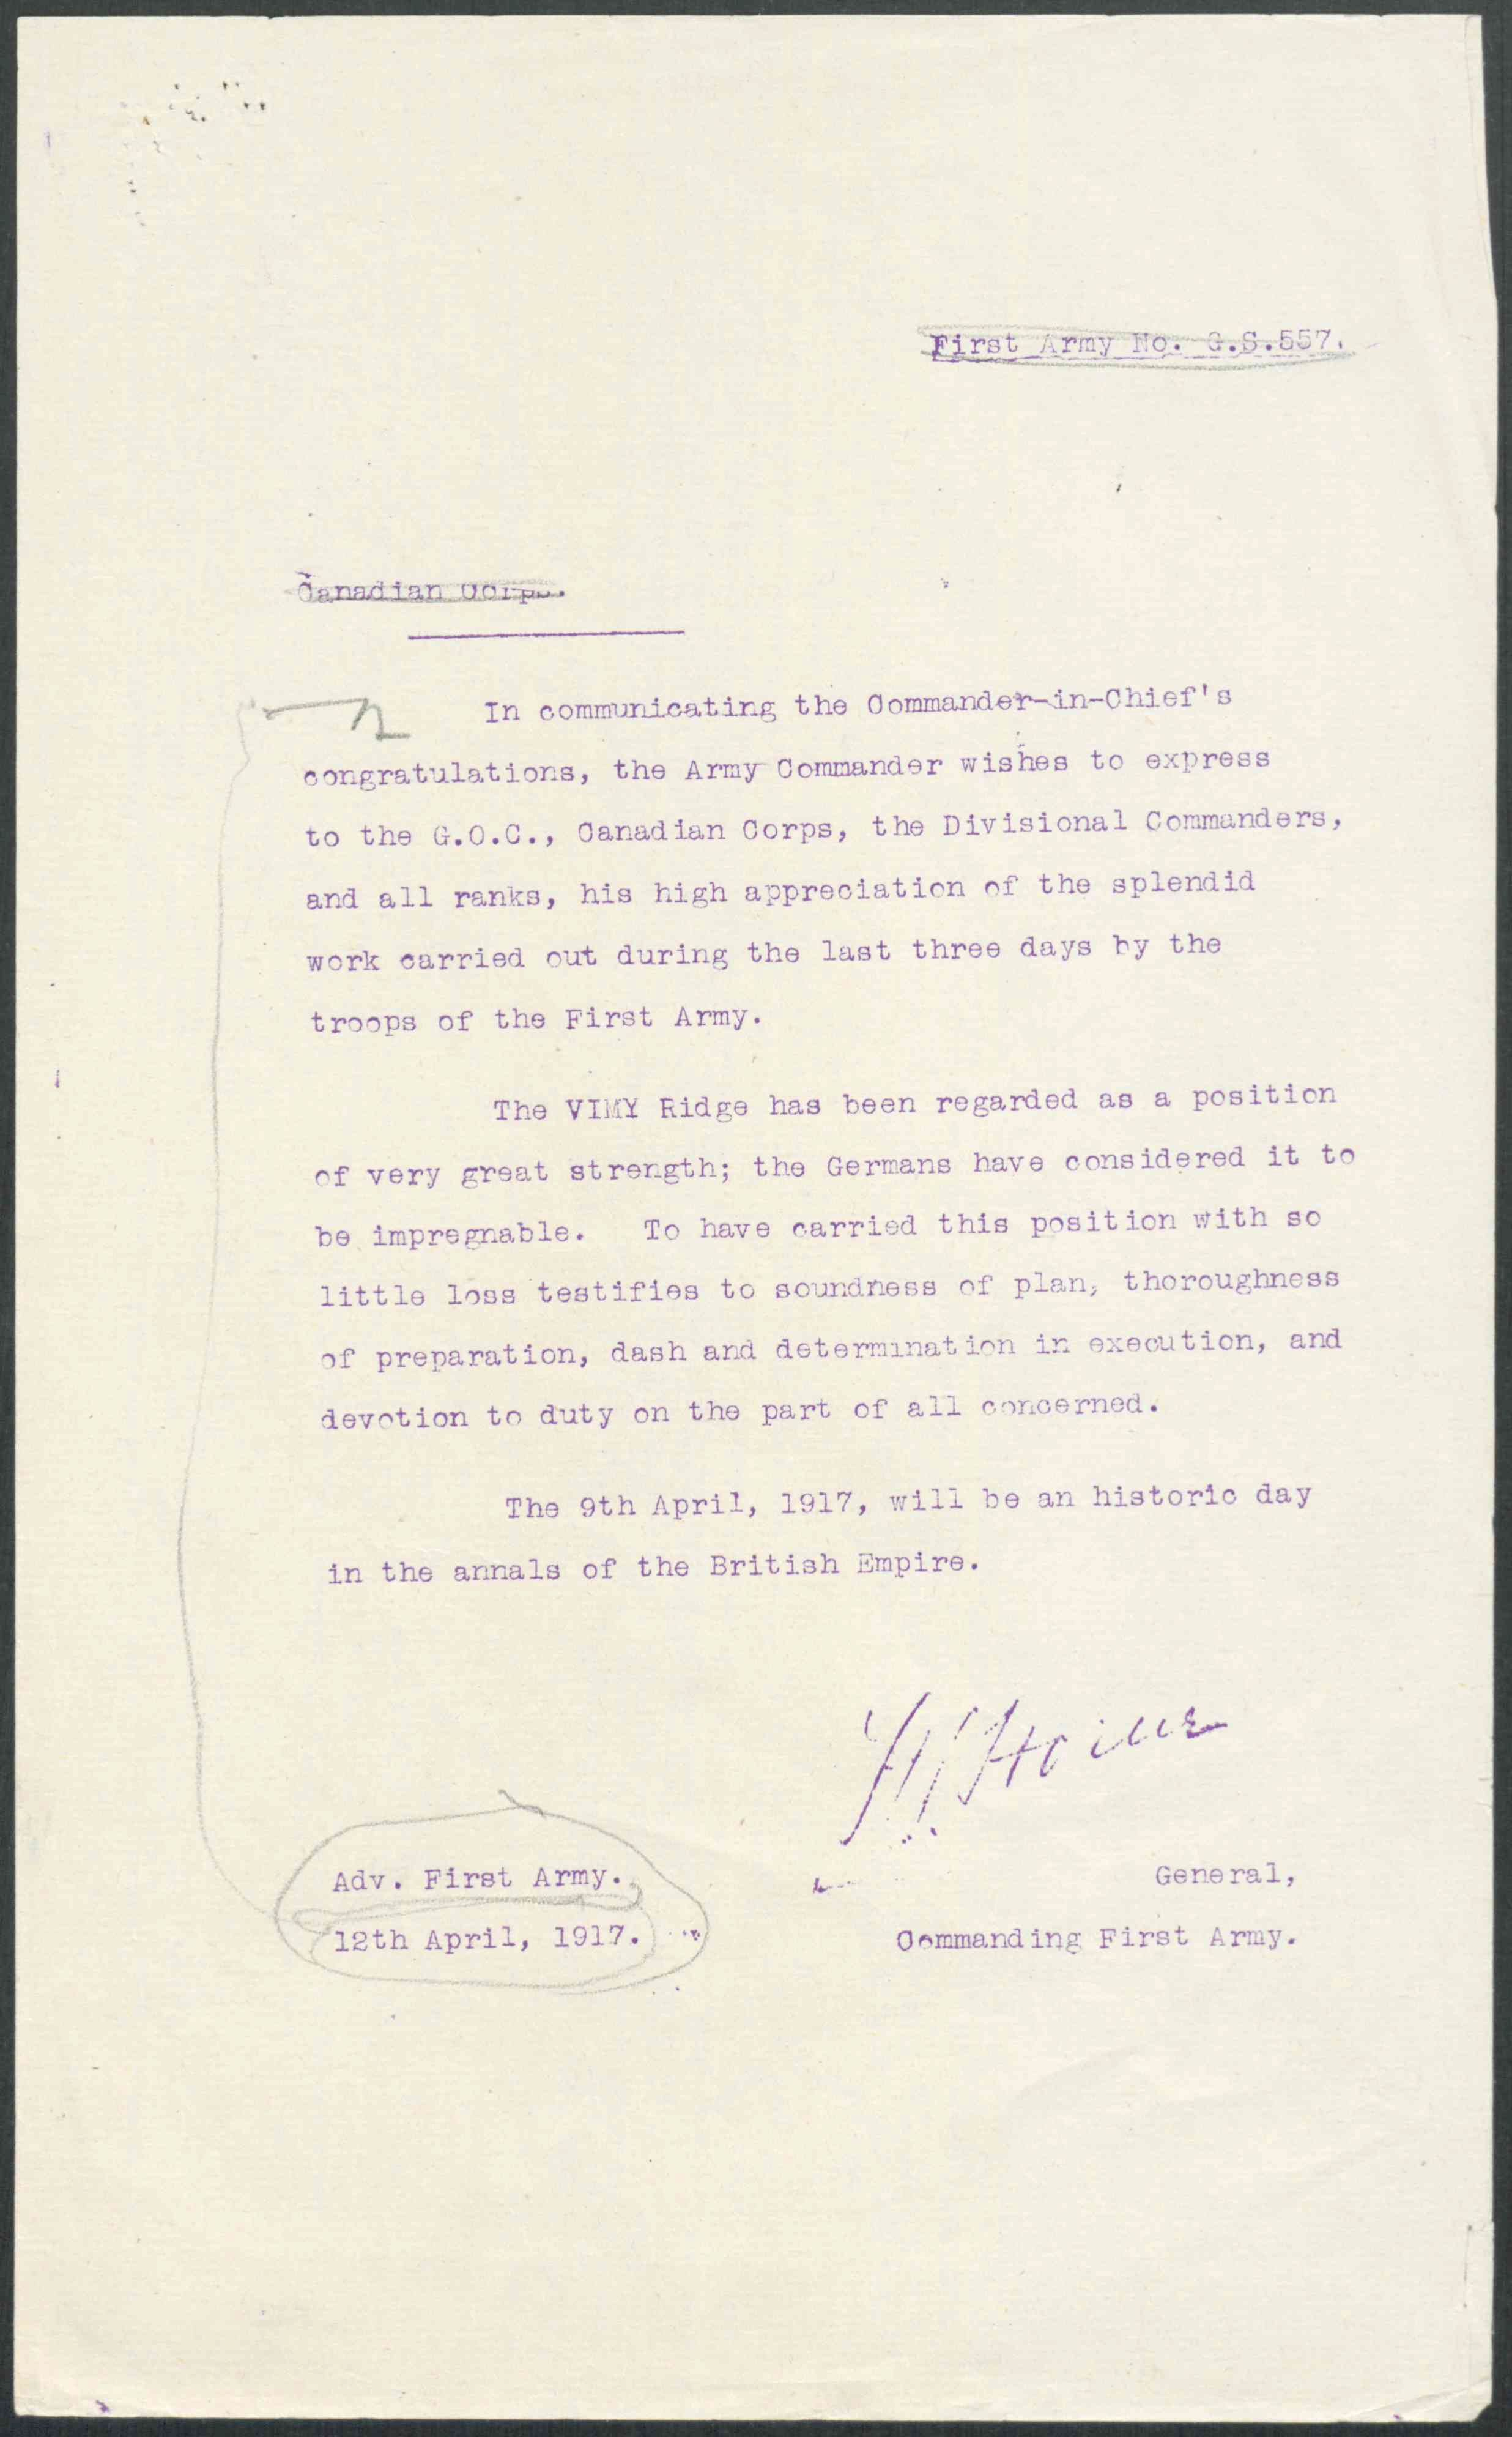
While the rolling barrage was successful in the preliminary attacks on Hill 145, the capture of the Pimple was one of the most costly battles in Canadian military history, with over 10,000 men killed, injured or missing.
Conclusion
The mapping of a battlefield is not a new concept. From the age of the Roman Empire to the Napoleonic Wars, generals and warlords have used maps to plan attacks and navigate battlefields. However, the development and production of these maps was usually done exclusively for high-ranking officers and non-commissioned members. At the Battle of Vimy Ridge, to ensure better overall preparedness among troops and to prevent confusion among infantry soldiers, maps of the battlefield were produced and distributed widely, so that even low-ranking lieutenants and lance-corporals would have access to the plan of attack. This innovation in how the allies fought during the First World War resulted in a hugely successful attack upon the German forces’ position on Hill 145 (Vimy Ridge) and Hill 119 (the Pimple) during the Battle of Vimy Ridge, part of the greater Battle of Arras. Maps illustrated clear and focused goals for individual units, and they demonstrated the tactics that the soldiers, artillery and support services would use to take the ridge. These maps followed many months of preparations for the Vimy Ridge battle; they were a major contributing factor in the CEF’s successful capture of Hill 145.
Additional resources
- Vimy Ridge: a journey of maps (part 1), blog post by Ethan M. Coudenys, Library and Archives Canada
- The Underground War: Vimy Ridge to Arras by Phillip Robinson and Nigel Cave (OCLC 752679022)
- Vimy by Pierre Berton (OCLC 15063735)
- Vimy 1917: Canadians and the Underground War by Dominique Faivre (OCLC 1055811207)
Ethan M. Coudenys is a Genealogy Consultant at Library and Archives Canada.